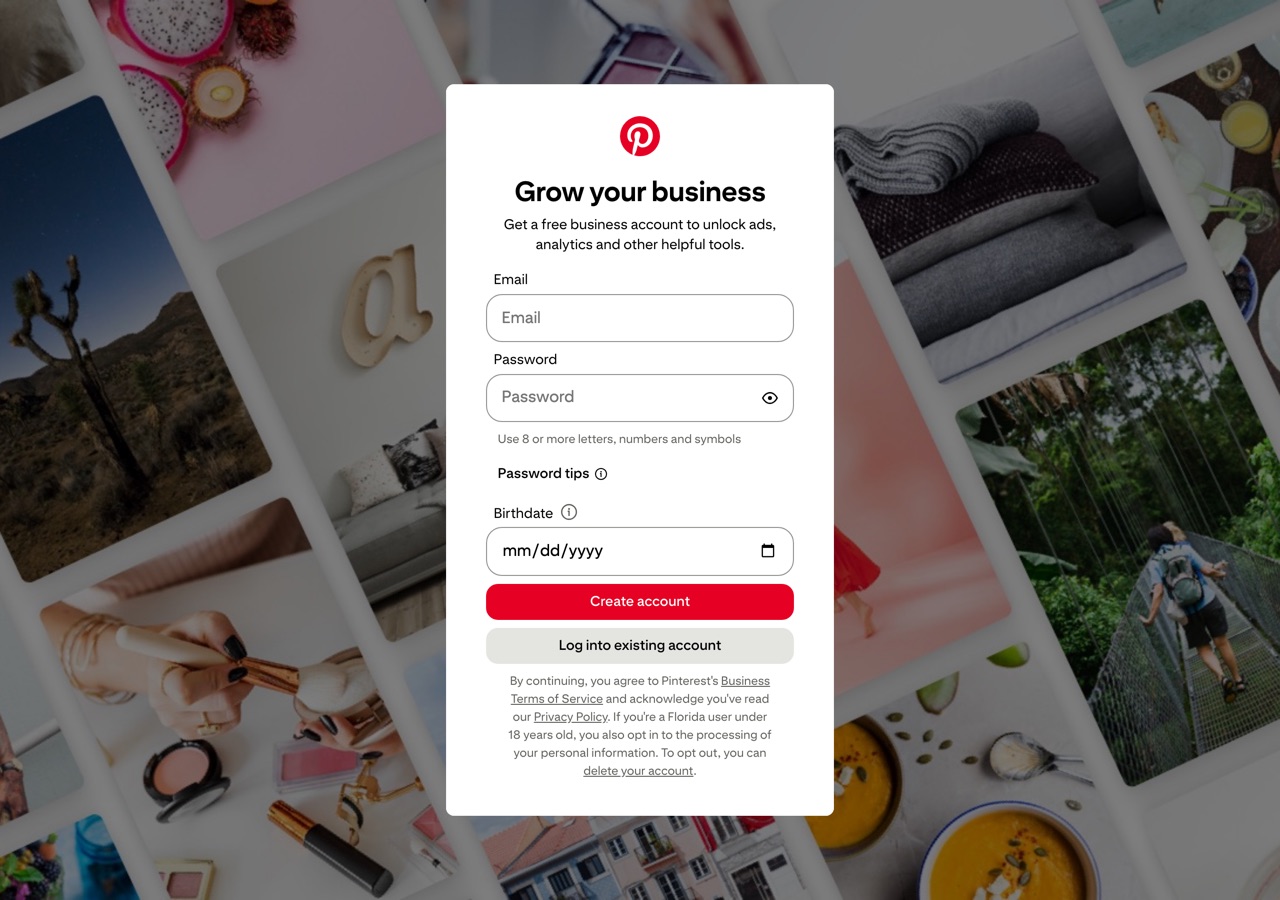
What you're building: a standalone Pinterest business account for the client, with the website claimed and starter boards live. Pinterest works like a search engine, not a social feed — Pins keep surfacing for months and years, so every name, board, and description is an SEO field.
⚠️ Big 2025–2026 change — read before training anyone: Pinterest removed "linked business accounts" (a business profile attached to a personal login). Old guides describing that option are dead. Every business account is now a standalone login with its own unique email. Agencies manage client accounts through Pinterest Business Manager (Part D), not by account-linking.
⛔ Before you start — you must have ALL of these
| # | Item | Why |
|---|---|---|
| 1 | A unique business email (client-controlled, not used on any existing Pinterest account) | Standalone account requirement |
| 2 | Business name, website URL, and the client's country/language | Asked at signup |
| 3 | Logo — square, upload ~600×600 px (displays as a small circle at 165×165) | Profile photo |
| 4 | Approved bio/about text (keep the key message in the first ~160 characters) | Profile field |
| 5 | Access to the website's <head> code, or file upload, or DNS — any one of the three |
Needed to claim the website |
| 6 | A list of the client's 5–10 core services/product categories with search-style keywords | Becomes the starter boards |
| 7 | 10–20 vertical images (2:3 ratio, 1000×1500 px) to seed the boards | Empty accounts look dead |
Convert vs create fresh: if the client has a personal Pinterest account with on-topic boards/followers, convert it (everything carries over: Pins, boards, followers). If the history is off-topic, create fresh. Converting makes the profile public and reversible (analytics are lost on reverting).
Part A — Create (or convert) the business account (10 min)
Path 1 — New account
- Go to pinterest.com/business/create.
- Enter the business email, a strong password, and age → click Create account.
- Walk the guided setup one screen at a time: business name → language/country → website → business description/category → goals/ads-interest screens (answer or skip).
👀 You should see: a fresh business profile with your business name at the top and an empty board grid.
📸 images/04-step-a.png — the business signup form and the finished empty profile.
Path 2 — Convert an existing personal account
- Log in on desktop → click the ▼ chevron (top right) → Settings.
- Left menu → Account management.
- Under Account changes, click Convert to a business account → Convert account.
- Complete the same business-details screens as Path 1.
👀 You should see: the profile now shows business features — an Analytics and Ads menu appear in the top navigation.
Step 1 — Complete the profile (both paths)
Settings → Edit profile:
- Profile photo: the logo.
- Name: "Brand Name | primary keyword phrase" (the name field is searchable).
- Username: brand name, max 30 characters — becomes
pinterest.com/username. - About: paste the approved bio — front-load keywords; state what you do and who it's for.
Part B — Claim the website (10 min + possible wait)
Claiming is not optional. It gets the client: analytics on every Pin from their site (even Pins other people save), their name + profile photo + Follow button on all those Pins, and it's the prerequisite for Rich Pins, shopping, and the Verified Merchant Program.
Step 2 — Open the claim screen
Settings → look for Claimed accounts (some accounts show Link to Pinterest) → next to Websites, click Claim.
👀 You should see: three verification options.
📸 images/04-step-2.png — the claim dialog with three methods.
Step 3 — Pick ONE method
| Method | Use when | What you do |
|---|---|---|
| Add HTML tag (easiest) | Site has an SEO plugin or header-injection box (WordPress/Shopify/Wix/Squarespace) | Copy the <meta name="p:domain_verify" …> tag → paste into the site's <head> → back in Pinterest, enter the URL → Verify |
| Upload HTML file | You have file access to the server root | Download the file → upload to the site root → Verify |
| Add DNS TXT record | You manage the domain's DNS | Copy the TXT value → add it at the domain host → Verify (⚠️ can take 24–72 h to propagate — don't panic) |
👀 You should see (success): "Connected" with a green checkmark, and the website showing on the profile with a globe icon.
🚩 "This site is already claimed": each domain can only be claimed by one Pinterest account — find who claimed it (old agency? old account?) and release it there first.
Shortcut: Shopify's Pinterest app claims the site automatically.
Step 4 — Rich Pins (2 min, on-site)
If the site has proper metadata (Yoast/Rank Math on WordPress; Shopify/WooCommerce products do this natively), Pinterest picks up Rich Pins (Article/Recipe/Product — live price and availability) automatically from claimed sites. Test any page URL in the debugger at developers.pinterest.com/tools/url-debugger/.
Part C — Boards and first Pins (15 min)
Step 5 — Create 5–10 boards
For each core service/product category:
- Profile → + → Board.
- Name (max 50 chars): a phrase people actually search — "Small Bathroom Remodel Ideas," never "Our Stuff ✨".
- Add a board description (up to 500 chars): what's on the board, keywords early, written like a sentence — no hashtag walls.
- Building before launch? Toggle Keep this board secret and unhide when seeded.
📸 images/04-step-5.png — the Create board dialog.
Step 6 — Seed each board with Pins
Create Pins (+ → Pin) using:
- Images: 2:3 ratio, 1000×1500 px (other ratios underperform; taller than 1:2.1 gets cropped).
- Title: up to 100 chars — only ~40 show in feed, so lead with the keyword.
- Description: up to 500 chars — first ~50–60 visible; 2–4 natural keyword phrases; skip hashtags (they're dead weight on Pinterest now).
- Link: every Pin gets a working destination URL to a relevant page.
- Formats that exist in 2026: image, video (9:16 or 2:3, 6–15 s sweet spot, design for sound-off), carousel (2–5 images), collage. ⚠️ "Idea Pins"/"Story Pins" no longer exist — Pinterest merged them into regular Pins in 2023–24; strike the term from any training.
👀 You should see: each board with at least 3–5 Pins so the profile looks alive before anyone is sent to it.
Step 7 — Set the operating rhythm (hand this to whoever runs the account)
- Fresh Pins win: a "fresh Pin" = new image/creative, even for the same URL. Steady cadence (start ~3–5 fresh Pins/week, scale up) beats bursts. Use the native scheduler or a partner tool (Tailwind, Later, Buffer).
- Season 45 days early: Pinterest's own guidance — publish seasonal content ~45–60 days before the holiday/moment (users plan far ahead). Christmas content ships in October.
- KPI = outbound clicks, not impressions. And set expectations: Pinterest compounds over 3–6+ months — do not let the client judge it at week 4.
Part D — Agency access via Business Manager (10 min)
Since account-linking is gone, this is how agencies manage client accounts — the client owns everything; the agency connects as a Partner.
Step 8 — Both sides need Business Manager
On each business account: hamburger menu (top left) → Manage business → Business Manager. The Business ID shows at the top of the left panel under the business name.
Step 9 — Client adds the agency as a Partner
In the client's Business Manager:
- Left nav → Partners → Add partner.
- Enter the agency's Business ID.
- Choose Share your assets with them.
- Select the profile (and ad account, if any) and set permission levels (ad-account levels include Admin, Analyst, Finance, Audience, Campaign, Catalogs; profile permissions cover content/board management) → send.
👀 You should see: the agency listed under Partners with the granted assets.
📸 images/04-step-9.png — the Add partner dialog with the Business ID field.
Employees (client's own staff) are added under Employees → Add employee (role: Employee or Manager) — each person needs their own business account login.
E-commerce clients only: once the account is ~3 months old with a claimed site, a connected product catalog, and the Pinterest Tag firing, apply for the Verified Merchant Program (free verified badge + shopping distribution). Pure service businesses skip this.
✅ DO / ❌ DON'T
| ✅ DO | ❌ DON'T |
|---|---|
| Create a standalone business account on a client-owned email | Don't follow old guides about "linked business accounts" — the feature was removed; unconverted linked accounts were deactivated in 2026 |
| Claim the website (and keep the claim) | Don't skip claiming — you lose analytics, attribution, and shopping eligibility |
| Name boards with real search phrases | Don't use cute/vague board names ("Inspo," "Yum!") — they're invisible to search |
| Make vertical 2:3 Pins (1000×1500) with fresh creative | Don't post horizontal/square images or endlessly re-save the same old Pins |
| Pin steadily (daily/weekly) and schedule ahead | Don't burst 30 Pins in a day then vanish — and don't dump many Pins to the same URL same-day (spam signal) |
| Ship seasonal content 45–60 days early | Don't post Valentine's Pins on Feb 10 |
| Give every Pin a working, relevant link | Don't leave links empty or point them at the homepage for everything |
| Connect agency ↔ client via Business Manager Partner (Business IDs) | Don't log into client accounts with shared passwords, and never own client assets under the agency login |
| Judge by outbound clicks after 3–6 months | Don't let anyone judge Pinterest performance at week 4 |
☑ Definition of Done
- Standalone business account created (or personal converted) on a client-owned unique email
- Profile complete: logo, keyworded name, username, bio
- Website claimed — green "Connected" checkmark; Rich Pins metadata tested
- 5–10 keyword-named boards with descriptions, each seeded with 3–5 Pins (2:3, linked)
- Posting rhythm + 45-day seasonal calendar handed to the account runner
- Business Manager set up; agency connected as Partner via Business ID with correct permissions
- (E-commerce only) catalog + tag noted for a Verified Merchant application at the 3-month mark
- All logins recorded in the client's password-manager entry
- 📸 screenshots captured at every marked step and saved to
images/